Build a $2 Computer
In 1936, Alan Turing conceived of a machine that helped lay the groundwork for modern computing. These extremely simple machines, dubbed Turing machines, are in theory able to simulate the logic of any known computer that can possibly be constructed. While Turing originally conceived of his machine only as a thought exercise and never constructed it, it is possible to build and program a simple version of Turing’s computer for only a few dollars worth of basic office supplies.
This is a fun afternoon project for all ages, and a great way to introduce both kids and adults to the fundamentals of computer programming.
Supplies
You will need:
– A magic marker
– A deck of 3×5 index cards
– Paperclips (optional)
One deck of index cards will allow you to build the machine and write several programs for it. If you want to write more programs, you will need more index cards. If you don’t have index cards, you can use paper instead.
Understanding Numeral Systems
Before you can build and use a Turing machine, you need to know a little bit about number systems. For example, most people know that modern computers are “binary” or that the numbers we ordinarily use to count with are “decimal”, but what does that mean exactly?
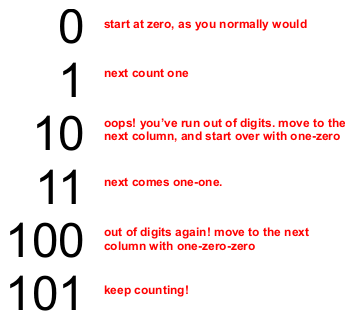
The words “binary” and “decimal” refer to the base of the number; the base is how many digits you must count before you roll over to the next digit. Decimal means base ten. Think decathlon or decimeter to remember that decimal means 10. Base ten means you must count ten digits–zero through nine–before you start re-using them and move to the next column. For example, if you start at zero and count all the way up to nine, when you reach nine you run out of digits, so the next number becomes one-zero. (Ten is just a fancy word for one-zero!) Likewise, when you get to 99 you run out of digits again, so the next number becomes one-zero-zero. i.e. 100
Binary means base two. Think of the words bicycle or biplane to remember that binary means two. To count in binary, you count two digits–zero through one–before you start re-using them and move to the next column. To count in binary, first you count zero, then one, then you’ve run out of digits so the next number becomes one-zero. Just like in decimal, every time you run out of digits you roll over to the next column.
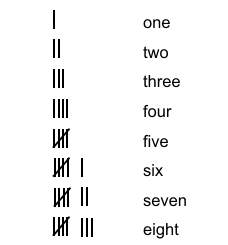
Modern computers use binary, but the Turing machine we are about to build uses an even simpler numeral system known as “unary”! A unary numeral system is a base one numeral system. Think of the words uno or unicycle to remember that unary means one. In a base-one system, you start at one, and then immediately move to the next column with one-one, then one-one-one, then one-one-one-one, and so on. This may seem strange, but you use this system all the time even if you do not realize it! For example, tally marks are a popular everyday usage of a unary numeral system–one line equals one number. Counting on your fingers, or using candies or pennies to track points in a playground game are other good examples of everyday unary counting.
[Side note: For those who may be concerned, grouping your tally marks by five isn’t the same thing as a new digit… it’s just like using a comma between thousands-places in decimal. It doesn’t change the number; grouping the digits simply makes it easier to read.]
How a Turing Machine Works
A Turing machine consists of an infinitely long tape, upon which “symbols” (i.e. numbers) can be written by an attached read\write recording head. The head has both a finite state and a finite set of instructions, telling the head what to do when it encounters a symbol on the tape. At each instruction, the machine may modify the symbol on the active location of the tape, change the state of the head, or move the head left or right on the tape.
The finite set of instructions is the key to it all. The idea in a nutshell is that if can you write down the exact procedure for doing something, you can hand that set of instructions to someone else and they’ll be able to do exactly what you did and come up with the same result. Note, that your list of instructions must be finite. “Finite” means “limited”. This is important, because it means that you can’t just go on writing new instructions forever. It means that once you’ve written down your steps, that’s it, you’re done. You’ve got to write down all the instructions about what could happen and how to handle it up front, before the other person tries to follow the instructions. You can’t add more later. A set of instructions like this is called an algorithm.
Think of an algorithm like a recipe. If you follow the exact steps, you’ll get the right answer to the computation; in the same way that if you follow the exact recipe for baking a chocolate cake, you’ll get a chocolate cake. Sometimes, as part of the recipe, you might be asked to make a decision and follow a different procedure based on the current state. For example, in a recipe for chocolate cake, you might be asked to stick a toothpick in the cake and see if it comes out clean. If the toothpick has sticky cake on it when you pull it out, the recipe will tell you to put the cake back in the oven for a bit. If the toothpick is clean, however, the cake is done and the recipe will ask you to take the cake out of the oven. In a computer program, this is called a “branch instruction”. It means, “read the current state, and do either A or B depending on what the state is”. Branch instructions let you make very powerful algorithms.
A Universal Turing machine, or UTM, is a Turing machine that is able to simulate another Turing machine. This is a very powerful concept, as it relates to the modern idea of stored programs. Basically, what Turing said is that if you could come up with a set of instructions to solve a problem, instead of just coding them permanently into a Turing machine, you could write those instructions into a table or tape in a way such that another Turing machine could play them back. This “universal machine” could then be used to solve many different kinds of computations depending on the program written in its instruction table. Neat, eh?
How to Make a Turing Machine
Take about half of your index cards, maybe a little more if you want to compute larger numbers. Turn the index cards so they are taller than they are wide; this will make your Turing machine a bit easier to fit on your desk later. Write a “1” on the front of each index card. Write a “0” on the back of each index card. This stack of index cards will form your “tape”.
Now, take three index cards and draw an arrow pointing down on them. These will be your read\write “heads”. In the corner, label each head 1, 2, and 3. In theory, any computation that can be solved on a machine with multiple heads can also be solved on a machine with a single head, but in practice some things are a lot easier to program if you have multiple heads.
The rest of your index cards we’ll use for writing programs. This is your table of commands or “instruction stack”.
Advanced Stuff: What about the “state register”? Earlier, we mentioned that a Turing machine consists of a tape, a head, a state, and a set of instructions. We have the tape, the head and the instructions… but what about state? Well, for simple programs you don’t really need it–the “instruction pointer” (aka. what instruction you are on) and multiple heads gives you all the state you need so I’ve omitted a separate register. But, if you really want one, you can use paperclips. Simply attach or remove paperclips from the heads to track your state; the number of paperclips denotes what state you are in. Again, you don’t really need it unless you are going to get fancy, so I won’t be using it in the examples.
Set Up
To set up your Turing machine, first you must lay out your “tape”. Place the tape index cards face-down in a long row, so that they all read zero.
Next, place the first “head” index card above the tape. Position the head at least three index cards over from left hand side of the tape. This is your starting position. You don’t want your starting position to be on the first index card, because you need to be able to move the head to the left of start for some programs.
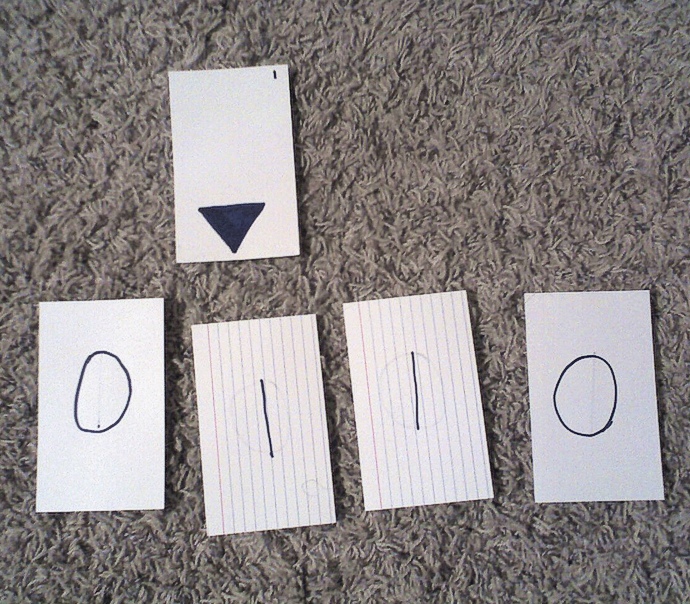
My Turing machine displaying the number ‘2’.
You can now enter an “initial value” into your machine. Your initial value is whatever number you want to perform an operation on. Starting at the head position, flip over index cards so they read “1” until you reach whatever value you want to start with. Remember, a Turing machine uses a unary number system. This means that each 1 written on the tape increases the value of the number by one. For example, if you wanted to perform an operation on the number four, you would flip over four index cards. Your tape would read 1-1-1-1.
How to Program the Computer
To program your Turing machine, you must write a set of instructions on a stack of numbered index cards. The rules for programming a Turing machine are simple. One index card = one instruction. Be sure to number your index cards in case you drop your program on the floor so they don’t get mixed up.
On each instruction you may do any of the following things:
– Read the current value of the tape. The current value is whatever number is written on the tape at the position that the arrow on the head is pointing to.
– Write a new value to the tape. You can flip over the index card that the head is pointing to, to change its value.
– Move the head a specified number of spaces to the left or to the right. For example, you could say “move the head three spaces to the right”.**
– Specify the next instruction to execute. You may “branch” instructions, and specify a different instruction to execute based on the current value of the tape. For example, you can say “If the value of the tape is 1, go to instruction #10. Otherwise, go to instruction #12.”. If you don’t specify an instruction, it is assumed that you mean to run the next instruction in the sequence. If the current instruction can’t be executed, the machine halts.
Additional programming tips:
– Always finish your programs in a “known state”. That means, return your head to the start position after you finish your calculation, don’t just leave it dangling out there. You should always be able to run the next program immediately after you finish your last without resetting anything.
– Geeze-o-pete, don’t do the “if the current instruction can’t be executed, the machine halts” thing! That’s called “crashing the computer”. If you mean your program to finish, write “end program” on the instruction index card instead.
Yes, folks, even a computer based on a deck of index cards can crash!
Your First Program: The Incrementer
A great program to start with is an incrementer. It’s a very simple operation, and a good example of how the machine works. It’s also a very useful operation, as modern computers use incrementers all the time for many different things.
An incrementer takes the current value, and adds one to it.
So, what is the algorithm for an incrementer? Well, remember that our Turing machine uses a unary counting system. That means, if we want to increase the value of a number by one, all we need to do is write another 1 to the tape.
I always like to break programs down into their steps before I write them, so here’s the general outline for the program:
– From the starting position, move the head past the end of whatever value is written on the tape.
– Write a one.
– Move the head back to the starting position, so we finish in a known state.
Ok! Now all we need to do is break it down into the individual instructions. So, first things first, let’s find the end of the value on the tape. Here’s how to do this, using the rules we outlined earlier:
#1: If the current value is 1, go to instruction #2. Otherwise go to instruction #3.
#2: Move the head to the right one space. Go to instruction #1.
Excellent. These two instructions will cause the program to loop until the head moves to the first blank space. Once we’ve reached the end of the value we want to increment, we have to add a one.
#3: Write a 1. Go to the next instruction.
Ok! We’ve done it, we’ve incremented the number. That wasn’t bad at all, was it? Some programmers would just end the program here, since it’s completed the task. However, a good programmer will leave the system in a known state and ready to run the next program. We’re good programmers, so we’re going to move the head back to the start.
#4: If the current value is a 1, go to instruction #5. Otherwise, go to instruction #6.
#5: Move the head to the left one space. Go to instruction #4.
#6: Move the head right one space. End program.
This code segment is another loop, similar to our first two instructions. It causes the head to keep moving left until it reaches a blank. When the head reaches a blank, we know we must be immediately before the start. So, we move the head back one step to the right leaving the head pointing at the start position and ready to run the next program. That’s all there is to it!
In summary, here’s the complete program listing:
-Incrementer-

#1: If the current value is 1, go to instruction #2. Otherwise go to instruction #3.

#2: Move the head to the right one space. Go to instruction #1.

#3: Write a 1. Go to the next instruction.

#4: If the current value is a 1, go to instruction #5. Otherwise, go to instruction #6.

#5: Move the head to the left one space. Go to instruction #4.

#6: Move the head right one space. End program.
To “run” the program, simply do exactly what it says on the index cards. If the card says move the head to the right, for example, move the index card representing the head one space to the right, so that it’s pointing at the next index card in the tape. Be sure to follow along exactly.
You can run this program again and again, and increment the number as many times as you like… or, at least until you run out of tape! A theoretical Turing machine has an infinite tape, so it doesn’t have problems with limited storage. Of course, that’s impossible to build in real life. Our tape is limited by the number of index cards we have, but I’m sure you can already see it doesn’t take a very long tape for the machine to be useful. If you want to operate on larger numbers, add more index cards. Be warned though: just because a Turing machine is a very powerful computer, that doesn’t mean it’s a very fast one! 🙂
Next time, we’ll implement some basic arithmetic, and learn how to use our Turing machine to add two numbers together.
** Note: By the book, a Turing machine can only move 1 step to the left or right in a given instruction. I suggest that you allow it to take more than one step at a time; this doesn’t change much computationally, but like multiple heads it makes the programs a little shorter and easier.
Tags: algorithms, computer, fun projects, kids projects, math, programming, turing, turing machine, tutorial, utm
October 19th, 2007 at 9:34 pm
they should give these to disadvantaged children in africa rather than that green abortion–the “100 dollar laptop.”
for two bucks a pop, you could educate a whole village for one c-note.