What is Ambient Occlusion?
Ambient occlusion is a lighting technique that is commonly used to create soft shadows on objects. Ambient occlusion isn’t used to create the type of shadows that are cast from objects with a light shining directly on them. Instead, ambient occlusion generates the type of deep shadows that appear in the corners or creases of things, where it is hard for the light to reach.
Technically speaking, ambient occlusion is a global illumination technique. However, in common usage of the term it is often referred to as a cheap alternative to global illumination. To clear up any confusion, what most renderers refer to as “global illumination” is actually an amalgamation of several techniques such as radiosity, metropolis light transport, image-based lighting or photon mapping. The actual techniques used differ slightly from renderer to renderer. Some renderers include an ambient occlusion term as part of their global illumination calculation; others do not.
Like most global illumination techniques, ambient occlusion is dependent on the other geometry in the scene. Ambient occlusion on its own generates less realistic lighting than “full” global illumination. However, ambient occlusion is much faster and less complex to calculate than other methods which is why it is still popular among game developers and in production animation.

(Left) Without Ambient Occlusion. (Right) With Ambient Occlusion
Click for larger image.
How Does Ambient Occlusion Work?
To understand how ambient occlusion works, it’s helpful to break down the terms.
“Ambient” refers to the indirect light in the scene. Ambient light is light that doesn’t come from an identifiable light source. It is light that is accumulated from stray photons bouncing around the room. Photographers sometimes also call this kind of light source “available light” or “existing light”.
“Occlusion” is the act of one object blocking another object. For example, if you are taking a picture and at the last moment a truck drives in front of you blocking the shot, the truck is “occluding” your view of your subject. Occlusion is important to computer graphics for many things besides just shadows. For example, many renderers can optimize the scene and render faster by culling objects that are occluded, or hidden, by other objects.
Ambient occlusion is a measurement of how much ambient light is blocked by nearby things. If an object or surface is occluded, less light can reach it, which means the surface will be in shadow. Creases, corners, hollows and the undersides of things tend to have a lot of ambient occlusion.
For Artists: Rendering with Ambient Occlusion
Most modern renderers support either some form of global illumination or ambient occlusion; many support both alone or in combination.
Ambient occlusion improves your render by making small details more visible and improving depth perception. A lot of the way humans perceive depth has to do with the size, darkness, and placement of shadows. Using ambient occlusion to add shading to your scene will help the viewer comprehend the placement of objects better.
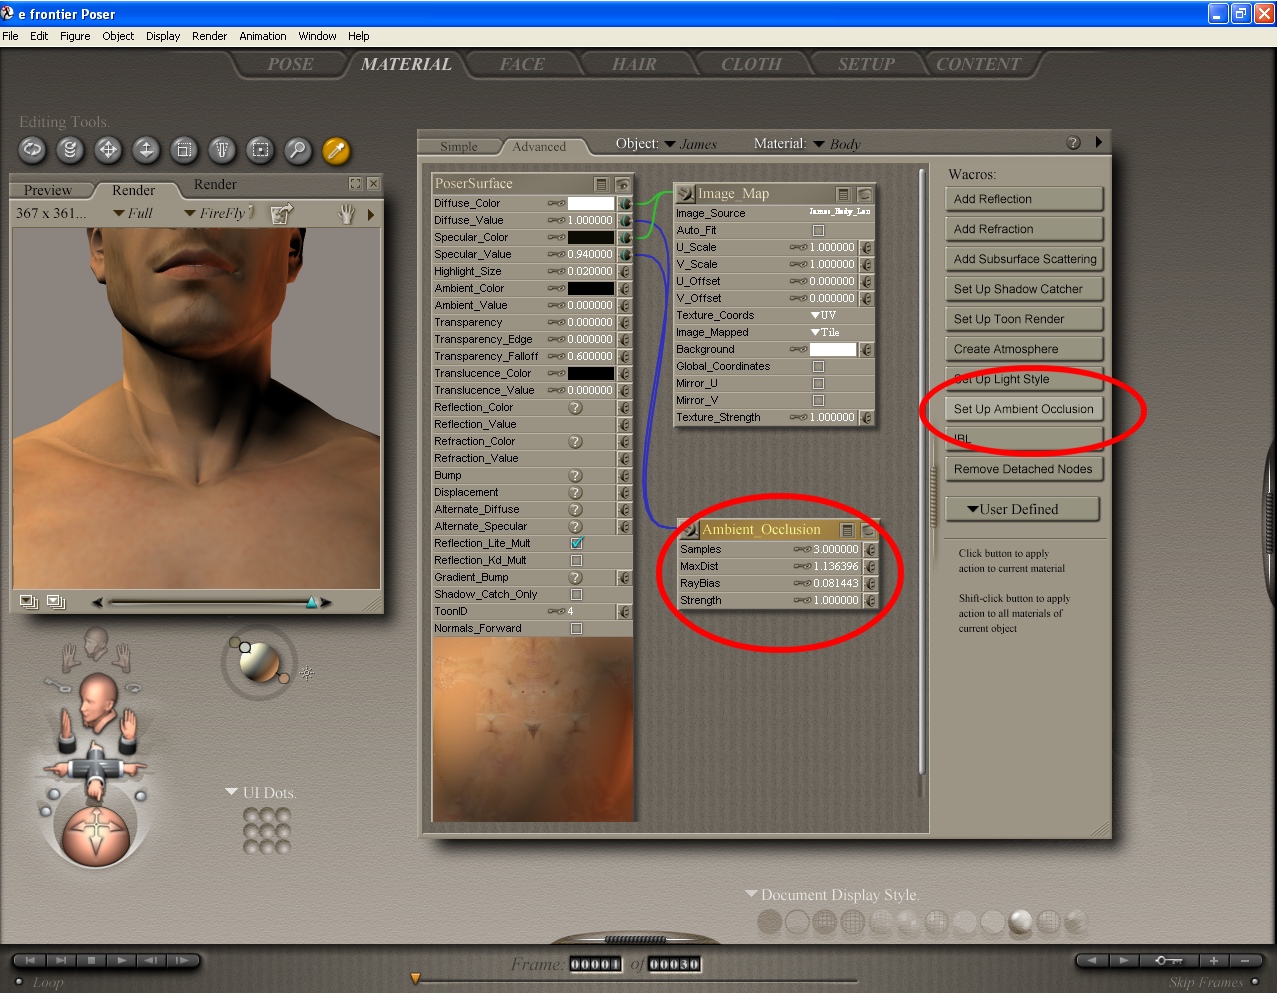
Ambient occlusion in Poser 6
While each renderer is different, often the basic concepts are pretty similar between many of them. As an example, here’s how you can add ambient occlusion to your render in Poser:
– Click to the Materials tab
– Use the eye dropper to select the material you want to edit
– In the Material Properties node editor, click the Set Up Ambient Occlusion Button. This will add an ambient occlusion node to you material shader.
Poser 6 gives you four properties you can adjust on the ambient occlusion node:
Samples – The number of ray samples that will be cast. The more rays, the finer the lighting, but the longer the render. Keep this number as low as you can unless the lighting looks splotchy, in which case, turn it up.
MaxDist – The maximum distance the ray will test. Larger values generally result in more shadows.
RayBias – The smallest distance the ray will test for objects. If you get black blotches on your figure, very slightly increase your ray bias. If you increase it too much, you will start missing shadows, so don’t turn it up more than you need to.
Strength – The blend weight of the effect.
For Programmers: Implementing Ambient Occlusion
As far as bang for the buck, ambient occlusion is one of the fastest ways to improve the quality of your game’s lighting without a tremendous amount of pain. There are many, many algorithms out there for calculating ambient occlusion and each has advantages and disadvantages depending on your engine features. That said, there are two methods in particular I’d like to point out.
Monte Carlo Ray Casting Method
I’m not sure if this is the oldest method for calculating ambient occlusion or not, but it was certainly the first method learned. Assuming you already have some sort of ray-triangle collision code, this method is very easy to understand and implement.
For each point you want to calculate lighting for, shoot out a number of random rays. (In truth, you don’t really want completely random rays… small random offsets from your surface normal seem to work best.) If the ray hits something, increase the shadow value proportional to the distance along the ray where the collision occurred.
With enough samples per point, this method can produce very good results. The downside is that this method can be very slow. Many games utilizing this method don’t calculate the ambient occlusion in real-time… the ambient occlusion is calculated when the level is loaded or off-line when the level is built, and the results are stored in a texture map.
[Incidentally… yes… looking at Poser’s settings, I’m guessing this or something very similar is the method they are using!]
Screen Space Method
Screen space ambient occlusion has been generating a lot of buzz lately. Screen space rendering methods in general are always desirable to real-time programmers because they run in constant time and constant memory, and aren’t inhibited by scene complexity. A good starting point for learning about screen space ambient occlusion is Martin Mittring of Crytek’s Siggraph 2007 presentation.
Basically, the notion is that by sampling surrounding points in the depth buffer you can estimate shadowed areas. Think of it (sort of) like running an edge-detection routine on the z-buffer. The method can produce some artifacts, but there are number of ways to combat them… and the benefit of course is that this method is fast even on complex scenes.
Again, there are many methods out there and numerous variations, but hopefully this is enough to get you pointed in the right direction!
Questions? Ideas? Links to your favorite method? Post a comment!
Tags: 3d, 3d graphics, ambient occlusion, cg, cgi, global illumination, graphics, monte carlo, programming, ray casting, ray tracing, rendering, ssao
April 24th, 2008 at 1:07 pm
Thank you. This was a very nice introduction to the subject – and answered a good handful of questions I’ve had for some time.
April 30th, 2010 at 4:49 pm
Hey, this was a really nice article! Thanks for making it so simple! 🙂 I do get scared of coding, so thanks for putting it at the last! 😛
January 23rd, 2011 at 10:33 pm
[…] http://www.independentdeveloper.com/archive/2007/11/27/what_is_ambient_occlusion […]
May 30th, 2011 at 1:58 am
[…] is also the part where “ambient occlusion” comes in, that shadow thing that makes it look like jewelry and clothing is actually sitting […]
August 22nd, 2011 at 10:00 am
As an individual developer, I am making a raytracer. I was having a little trouble with my ambient occlusion method. All I needed was that first paragraph. Thank you 🙂
December 5th, 2011 at 2:15 pm
Super Useful!!!
Thanks
April 27th, 2012 at 4:40 pm
That was a beautiful and simple explanation! I won’t forget this now. Great job.
June 2nd, 2012 at 2:58 pm
Thanks for this explanation. It’s very well-written and cleared the issue up for me. I had wondered what that framerate-killing “SSAO” option was in Amnesia: The Dark Descent.
February 24th, 2013 at 10:54 pm
thanks for sharing knowledge.
this is helpful for understanding AO technology.