Sculpted Prims from Existing 3D Models
The AC3D “sculpted prim” exporter for Second Life has some unique capabilities versus other sculpt map exporters; it is one of the very few that is capable of exporting an arbitrary polygonal model. While not all models are good candidates to become sculpties due to limitations of the sculpted prim format, a surprising number of models can be converted quite well–including many pre-existing models that were never designed for Second Life.
This tutorial provides a quick walk-through on how to setup a pre-existing model for import into Second Life using AC3D.
Quick Glossary:
Sculpted Prim or “Sculpty” – A Second Life 3D primitive whose shape is determined by a bitmap.
Sculpt Map – A 3D displacement map used by Second Life to make a sculpted prim. Sort of like a topographical elevation map you might have seen in geography class, but it contains 3D data instead.
UV Map – The layout of the texture coordinates of the model. Basically, a UV map says “stick this piece of bitmap to that part of the model”. U and V refer to the 2D coordinates in texture space of a vertex, in the same way that X, Y and Z refer to the 3D coordinates of the vertex’ position.
If you don’t have the AC3D export plug-in for SL yet, you can read about it and download it here.
Step One: Select an Appropriate Model
Start by selecting a model you wish to convert to a sculpted prim. Remember, according to Linden Labs, sculpted prims were designed specifically as an approximate representation of organic shapes. This means that some kinds of models are better suited to make into sculpties than others.Specifically, the following types of models will normally convert easily and make very good sculpted prims:
– Models with smooth flowing curves combined with natural lumps
– Heavily subdivided shapes that are very smooth
– Organic shapes such people, fruit, animals, plants, landforms and soft clothing
On the other hand, you’ll want to avoid these kinds of objects:
– Models with sharp corners and very flat surfaces
– Hard points or large numbers of small protrusions
– Rigid man-made shapes such as a square table or desk, or anything with 90 degree angles
Models with sharp corners or flat surfaces are best made out of the other conic primitives that Second Life provides. While it is still possible to export these models as a sculpty, they generally require much more tweaking of the UV map and may still suffer from visible artifacts. Organic models, on the other hand, will usually export with much more pleasing results.
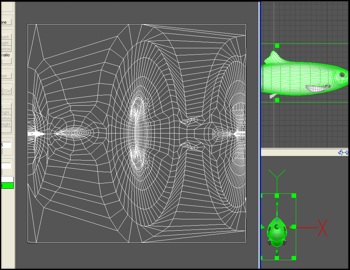
For this tutorial, I’ve selected an old model of a herring that I had sitting on my hard drive. This model was not built specifically for Second Life; but it does have all of the features that make a good sculpty. The herring is a good choice because it is a smooth, organic shape. The round shape of the fish’s body also means that it will be easy to UV map, so we’ll be able to texture it and get it in-world very quickly.
If you’d like to follow along, you can download both the before and after models:
herring_before.ac
herring_after.ac
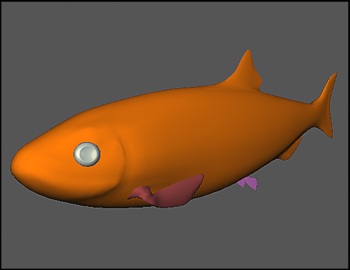
“The Herring”
Step Two: Partition Your Model
You’ll get better results if you partition your model so that it is mostly-convex. Detach any small, protruding objects and make them into their own mesh. This isn’t strictly required, but this will make your model much easier to UV map. It will also improve the sculpt map resolution, because each individual mesh in the model will get its own sculpt map, allowing you to have more vertices in total. As an added bonus, by making the fins into their own prims, you can animate them later by adding a little LSL script.
Looking at the fish, the eyes are the first obvious part that should be cut away. As it turns out, the eyes are already a separate mesh, so there’s nothing that needs done here. Hide the eyes by selecting them and pressing the Hide button.
Next, it’s time to detach the fins. The pectoral fins, the small fins on the sides of the fish, need to come off. To do this, switch to Surface mode, and highlight the surfaces that make up each fin. Once highlighted, selected Cut Away Object from the Surface menu.
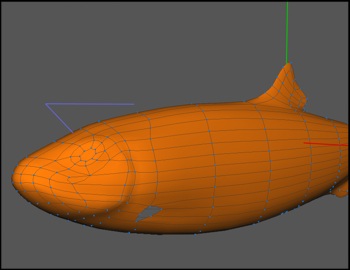
Herring with eyes and fins split off.
Repeat the same thing for the small fins on the underbelly of the fish. The dorsal fin on top and the small fin at the rear of the fish can stay attached or be removed; it’s really a judgment call depending on whether you want fewer prims or more resolution. They’re pretty thick, so they should hold resolution just fine as part of the main sculpty, so I’m electing to leave them attached.
[Ed.: After finishing the layout and exporting the model, I realized it would look better if I cut the tail off, too, especially since that’s a pretty obvious part to animate. Doh! The final in-world shots show the two piece tail.]
Step Three: Fill in Any Gaps
To make a proper sculpt map, you must have no holes in the UV map. There are two different ways to accomplish this:
1) Snap together the UVs after you’ve mapped your model to fix any gaps in the texture
-OR-
2) Add geometry to make sure you have no gaps before you map the model.
Both methods work equally well. This model has very minor holes, so I’m inclined to just add a little geometry.
[EDIT: I realized there has been some confusion about “holes in the UV map” versus “holes in the model”. Holes in the model are okay… these will fill in when it’s imported into SL. In fact, the default sphere that comes with the plug-in has a tiny hole at the poles. Holes in the uv map on the other hand are a problem. The UV map must have no holes. In this tutorial, I use geometry to fix the UV map. However, I could have just as easily left the holes in the model and snapped the points together in the texture coordinate editor. Again, making sure there are NO holes UV MAP is the part that is important, not the model.]
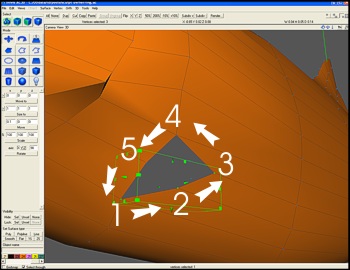
Select vertices in counter-clockwise order when creating an ordered surface!
To do this, switch to Vertex mode. Then, click on each vertex around the area you want to fill in, in counter-clockwise order. Be sure to click your vertices in this order! If you don’t select the vertices in order, you will end up with a degenerate surface. You will know you did it wrong if the surface turns red, and the edge lines go every which way. Undo and try again. If you select the vertices in clockwise order instead of counter-clockwise, your surface normal will be inverted. This may cause your sculpty to appear “inside out” when it is exported. You must select the vertices in counter-clockwise order.
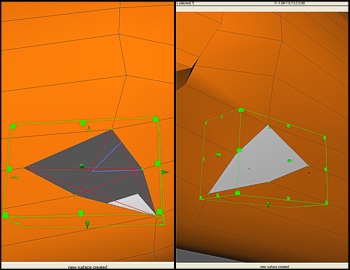
(left) Face will appear with red lines if your selection order was incorrect.
(right) Corrected surface.
After you’ve selected the vertices, click Vertex > Create Ordered Surface. This will create a new surface from the selected vertices, closing the hole. If you do any serious modeling in AC3D, you will probably use this function a lot, so it’s worth memorizing the hot key (Control-Shift-S).
Fill in the remaining holes in the model, including the holes on the ends of the fins themselves.
Step Four: UV Map Your Model
To create a sculpt map, you must have a perfect UV map, which means you cannot have any holes or gaps in your map, and that your UV map must wrap in all directions.
[Note: It is possible to change the mapping mode using an LSL script, but for this tutorial we will only use the default mapping mode–no scripting required!]
It doesn’t really matter what technique you use to map object, just so long as you end up with no holes and full wrapping in the end. I like to start with a spherical map myself.
To do this, open the Texture Coordinate Editor from the Tools menu. In addition, open the UV Map control panel, also on the Tools menu. (If you have an older version of AC3D, you can obtain the UV Map tool as a plug-in from supercoldmilk.com)
In the main window, select the first mesh you want to UV map. I started with the eye, since I knew that would need very little fix-up. In the UV Map control panel, select Spherical under Shape Mapping, then click Apply. Depending on your shape, you may need to play with the axes to see which mapping gives you the best fit. For the eyes, I aligned around the Z axis, which gave me the best result. What you want is a map layout where every triangle has some texture space, but few or none are overlapping. If the map is nearly square to start with, that’s all the better!
Once the spherical map is applied, it’s important to make sure the map runs edge to edge. In the Texture Coordinate Editor window, click the Snap > Max button. If you need to, adjust any stray UV coordinates by moving the vertex position in the Texture Coordinate Editor window. Manually adjust as needed until the texture completely fills the available space. The default spherical mapping also sometimes causes overlapping UVs. You should correct this by gently adjusting the points so that you do not have any overlapping texture space. Don’t worry if you have to cheat it a little–sculpt maps are pretty tolerant of the wrapping being off a bit.
The uv map for the herring’s body. The “nose” is in the middle, and the skin wraps in all directions with no holes.
Repeat the process for each object. You may have to do some manual texturing for some of the complex shapes. I’ll do a more in-depth tutorial on texturing in general at a later date, but basically what you’ll want to do is grab the surfaces a section at a time, apply the mapping, and then snap the vertices together in the Texture Coordinate Editor so there are no gaps or seams.
Keep going until all of the pieces are UV mapped. You’re almost done!
Step Five: Name Your Parts
If you have multiple meshes in your model, be sure to give each mesh a unique name. That way, you won’t run into name collisions when you export the model. The sculpty exporter is designed to export all of the sculpt maps at once if you have a model with several meshes.
I named the fish parts: fish, tail, rpectoralfin, lpectoralfin, reye, leye, rfin and lfin.
You can name a mesh either by selecting its Object Properties from the Tools menu, or by editing its name in the panel just above the materials palette, in the lower left-land corner of the screen.
Step Six: Export!
From the File menu, select Export, then select Second Life Sculpted Prim. This will create a series of TGA files, one for each mesh in your model.
If you have the newer version of the plug-in, you can export a “normalized” sculpt map instead. This makes the sculpt map use the full range available to it. Your sculpt map will be smoother and more precise, but you will have to re-size the shape inside Second Life after you import it.
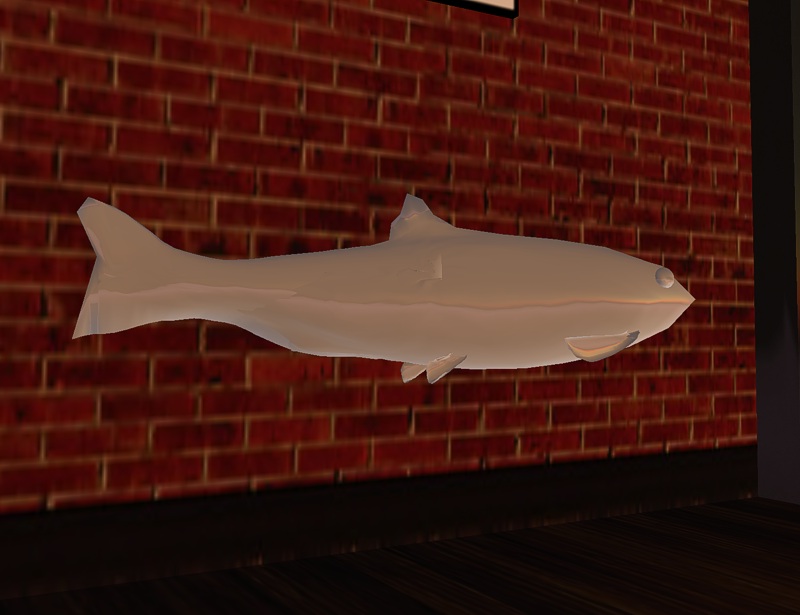
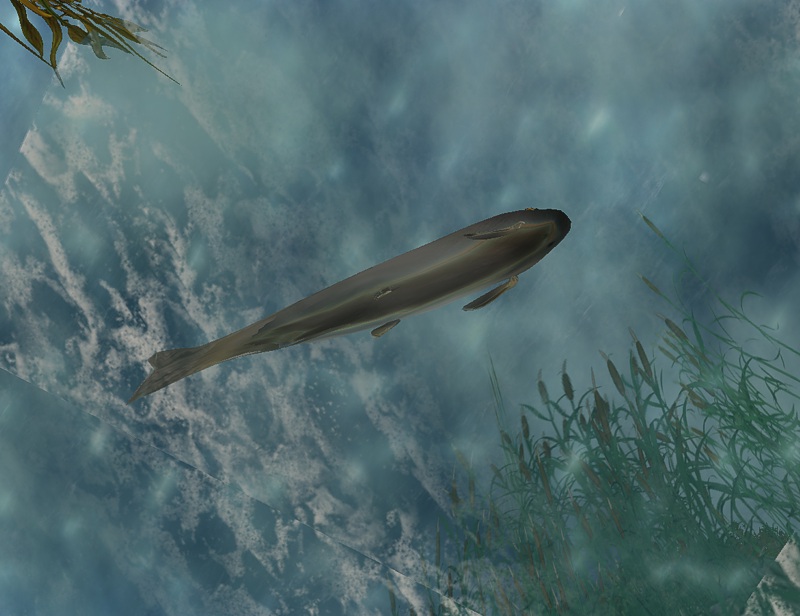
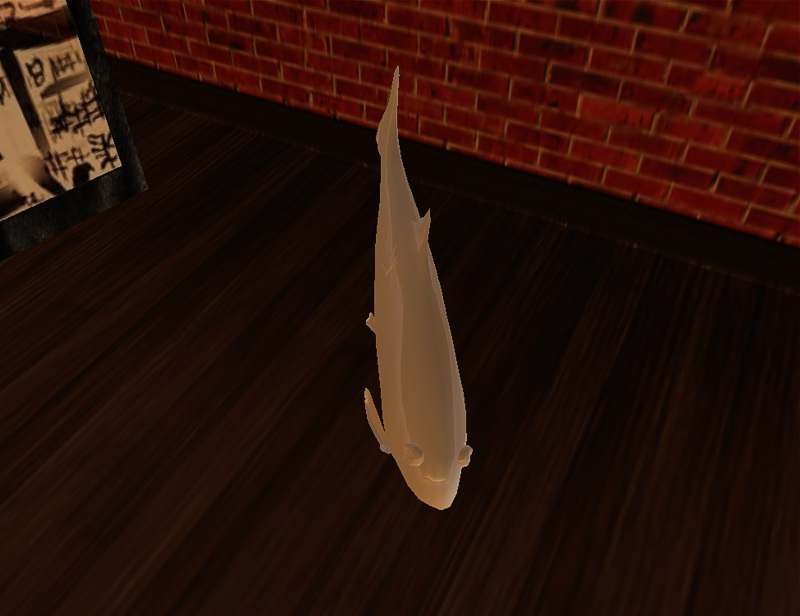
That’s it! Your model is exported and ready to import into Second Life.
Here are some images of how the final, imported model looks in-world (textured and untextured):
Tags: 3d, 3ds, ac, ac3d, export, import, linden labs, map, model, obj, prim, sculpted, sculpties, scuplty, second life, uv, uv map
July 24th, 2008 at 6:45 pm
Sculpted Prims with AC3D…
I for one was very relieved when the announcement about AC3D adding sculpted prim support came out. Yes, old news now, but old news is good news for those of us with severe allergic reactions to Blender. If you’ve never used AC3D before, it…..
August 27th, 2008 at 8:04 am
oh.. i am quite frustrated now.. i´ve been trying to import into SL now for hours.. and cant see my mistake.. ffffffff… I ve been reading an searching and whatever. But i dont see the mistake. AC3D V. 6.4.30.
Working with the predelivered objects for SL, changing them, export them (SL sculpted prim), move over to SL, upload it.. and in preview while upload i allready see that it is sh**.
All seems to focus around the uv map (i assume) but i really dont have an idea how to work that one out. I am not even trying to make that fish of yours. I simply use a (premade) cube, alter it a tiny bit, export it. No success. I tried to figure out how the TCE might affect it… but dont understand.
ahh.. pleassseeeee help…
Antario Denja
November 28th, 2008 at 2:45 am
Hey! I’m responding to Antario’s comment on August 27th… (I know… I’m late, but maybe someone will read this page with the same problem…)
The SL sculpty upload preview is broken. In fact, it’s so BROKEN I almost have to spell it with a backwards ‘K’ and the ‘N’ falling down on the next line. You can’t get any idea if your sculpt is good from the preview window – the preview can look like popcorn and your model looks fine inworld. The only way to see if you’re doing things right is to go ahead and upload the image.
To save yourself a few (hundred) lindens over time, you can use the beta grid to develop your sculpties, as you don’t spend any real money to test your uploads over there. Since there’s not currently a beta viewer for download (Why not, LL?) from the main SL viewer, you press Control Alt G at the login screen and you should get a drop down box of ‘grids’ to connect to. The main-real-normal grid is codenamed Agni, and the Beta grid is codenamed Aditi. If you select Aditi and log in, you should find yourself on a small grid with a snapshot of the way your inventory was several months ago, and 5000 fake Linden in your temporary wallet… you can upload and view your sculpties to your heart’s content then go back to the main grid (Agni) and upload them for real, paying your 10L.
Last note…. the login database for Aditi is a snapshot of the Agni one, just as the inventory database is an old snapshot…. it gets updated every few weeks, so if you’ve got a particularly new account, you may not be able to log in to the beta grid. They’ll update it eventually, then you’ll be good to go.
Hope all that helps! Thanks for the great tutorial!
February 4th, 2009 at 11:16 pm
Really well written tutorial. Thanks so much for sharing your knowledge on this topic.
March 6th, 2009 at 8:31 am
Would love some more help on creating the texture mesh from scratch.
If you ever get that done PLEASE let me know.
THanks.
June 24th, 2009 at 7:43 pm
Thanks for the great tutorial.
Anyway,
you said “…one of the very few that is capable of exporting an arbitrary polygonal model…”.
What are the other ones?
June 26th, 2009 at 10:20 am
Thanks for posting this. I downloaded ac3d today version 6.5.28 and I don’t see the UV Map control panel on the tools menu as you describe above. Also I don’t see an apply button anywhere. Do I need to download the plug in?
July 14th, 2009 at 9:15 am
Hiya, thank you for the effort put into educating folks like me. This tutorial answers so many questions, a goldmine for the really new artists.
January 24th, 2010 at 7:01 pm
when i select the vertices, and click Vertex > Create Ordered Surface, i got this:
http://img687.imageshack.us/img687/9494/48565820.jpg
please help
April 20th, 2010 at 2:08 am
Heya, been following your blogging site for a long period. I run a comparable web publication however I always keep receiving a lot of spam responses, how can you keep your blogging site so unpolluted?
May 13th, 2010 at 8:58 am
We use a backend spam filtering module that comes with WordPress combined with manual comment review to prune out what gets through that filter.
June 19th, 2010 at 9:31 pm
[…] at the Independent Developer blog shows how she creates Second Life Sculpted Prims from existing 3D shapes using a program […]