How to Make Two Shapes from One Prim
Many times people ask me if it’s possible to create two disconnected shapes from one sculpted prim–without resorting to alpha maps. The answer is yes, you can! It can be a little tricky depending on the shape, but it absolutely can be done. Today I’ll show you how using the AC3D exporter.
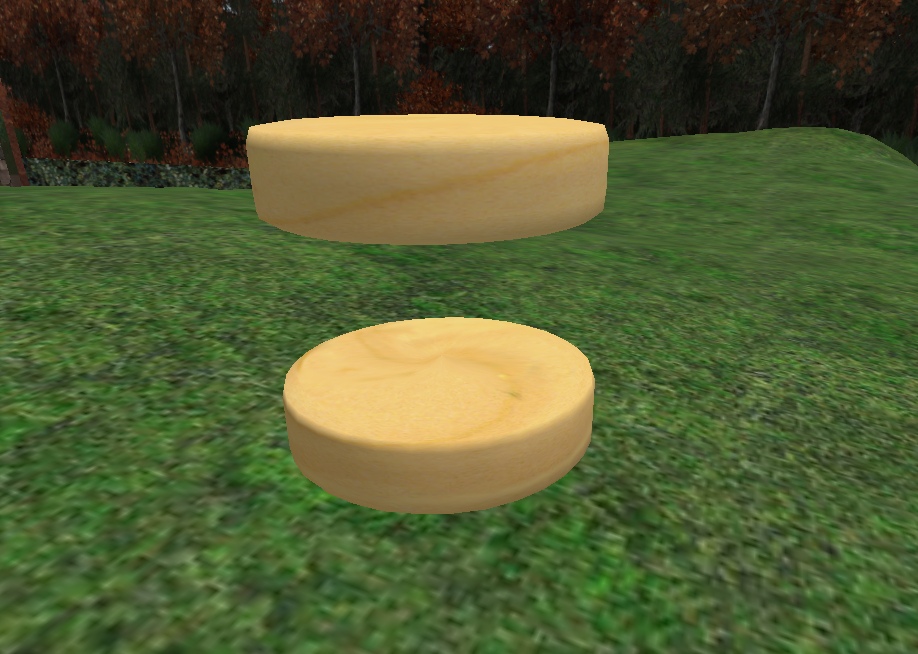
Two disconnected shapes made with one sculpted prim.
By default, Second Life generates the geometry for sculpted prims as a sphere. Each pixel in the sculpt map is a 3D displacement of a vertex on this sphere. This means that all sculpted prims are in fact deformed spheres. This creates a problem, because if sculpted prims are really just spheres, how can you make one sphere into two shapes? Technically, you can’t… but with a little knowledge of how 3D graphics cards work, we can set up our geometry in such a way that the graphics card will render one piece of geometry to look like two.
The secret is to use degenerate triangles. A degenerate triangle is a triangle where two of the three points lie in the exact same location. This means that the triangle has zero thickness; it’s just a line. Most video cards are designed to silently discard degenerate triangles automatically. They don’t even get rendered at all. Many games use this feature to connect triangle strips. Video cards can render faster if all the triangles are sent in one long strip; by discarding degenerate triangles, video card designers allow game developers to concatenate long strips of triangles that might otherwise be impossible to join together.
We can exploit this functionality to make one prim into two. By connecting the two shapes you want visible with degenerate triangles, the geometry connecting the shapes won’t be rendered by the graphics card at all. This is not the same alpha mapping. Alpha mapping just hides the geometry with a texture. With degenerate triangles, it’s like the geometry didn’t even exist in the first place. The degenerate triangles will be dropped by the video card and you will end up with what looks like two perfectly separate shapes on the screen.
So how do you do it? Create your two shapes in AC3D, but make sure they are joined together when you build them. Texture the shapes as if they were all one object. A smooth, continuous uv map should completely wrap both shapes. Like all other sculpted prims, the usual rules apply: No holes or gaps in the texture coordinates, and the texture coordinates must fill the entire uv map.
Once you have the shape mapped correctly, grab the triangles connecting them and scale them until they are completely flat. You want to make the triangles connecting the two shapes completely degenerate. You can use Vertex > Snap Together to move the vertices if need be and make sure they are completely aligned. When you’re finished, export the sculpt map as normal.
Side note: don’t optimize the shape when you are finished! AC3D’s vertex optimization will weld the vertices; and more importantly AC3D’s surface optimization is specifically designed to remove degenerate faces. In this unusual case, we want the degenerate surfaces, so don’t optimize!
Here’s what my double-cylinder looks like in AC3D. Note the ring of degenerate triangles connecting the two cylinders:

Double-cylinder (before subdivision)
Here’s what the uv map looks like. Note again that both cylinders share one uv map that is completely seamless:
That’s all there is to it. Notably, this will be much easier to do with some shapes than others, especially if you are new to uv mapping. Complex shapes will take some practice to learn how to map this way. If you are a novice at texturing, I’d recommend starting with one of the base shapes and modifying it to make your double-shape sculpty rather than mapping one from scratch until you get a better sense of how it works. For advanced users, if you have very complex shapes you might want to use an LSL script to change the mapping mode; cylindrical and torus can be very helpful here, especially if you need a hole in your shape.
Have fun!
Tags: 3d graphics, 3d modeling, ac3d, sculpted prims, sculpties, second life, SL, tutorial
August 17th, 2008 at 9:08 pm
This is great but I’m lost on this part – Create your two shapes in AC3D, but make sure they are joined together when you build them
Do you weld them together? I’m still wanting to use polygon models but the maps are never working out even though they look to be in the tce. I think the two hardest things are the tce and figuring out how to divide things up more to get some precise details to stick. I use the sculpty models that were packaged in a zip for everything I make. I wish there was some polygon ones but the remapping in the tce is where I have my #1 problem.
August 22nd, 2008 at 1:34 pm
Yes, correct, weld them together then uv map them after they are welded. Alternatively, if it’s easier, you can start with one model and squeeze together the middle like I did in the tutorial to make one into two.
October 3rd, 2008 at 1:28 pm
Hi, Thanks for this tutorial, I really want to make this two shapes… but I tried and tried without success, could you help me?
July 3rd, 2009 at 10:03 am
Hi there. Thanks for taking the time to create this tutorial but I’m having some real trouble trying to get it to work. Is there any chance of a more step by step format of this tut? I’m clearly missing something but not sure what. I’ve tried welding the shapes together but have had no success whatsoever.
Thanks for your time and hope to see some more great stuff from you soon.